Showing posts with label pattern. Show all posts

Sunday, 5 February 2012

Photoshop tutorial for creating pattern pieces

I told my Bee ladies I would put up a photoshop tutorial for creating the pattern pieces I use for my Chris block and then promptly forgot all about it!

I'm not sure if anybody has access to photoshop, but it's all I know so at long last, here it is in 10 easy steps!

1. open you chosen photograph in photoshop. I tried to pick a picture that had a good contrasting background (this was harder than I expected as all my photos seem to be taken with detailed backgrounds.)


2.  Using the magnetic lasso tool (L) mark around the area you want to cut out, then double click on the layer to unlock it.


3. Once the layer has a name other than "background" you can delete the contents of the lasso and you will be left with a grey and white check where the background used to be.

Then you can clean up any remaining bits of background with the eraser (E)

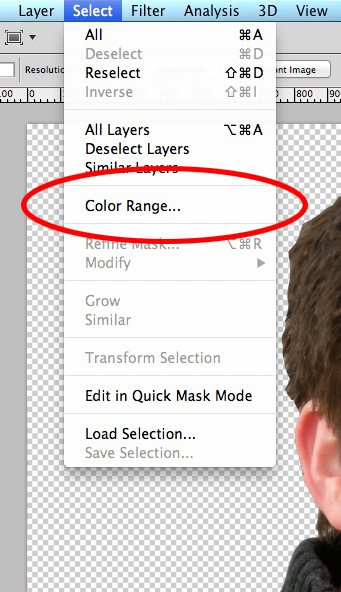
4. Select "colour range" from the "select" menu.

5. From the drop down menu, select "highlights," and on a new layer, flood the selection with a pale grey.

6. Go back to "layer 0" and repeat for midtones, colouring with a mid grey on a third layer.

7. Go back to "layer 0" and repeat for shadows, colouring with black on a fourth layer.

8. Turn off the layers so that only one is showing at any one time.


9. Print each layer onto a separate sheet of a4 to create your templates, I found it easier to stack the applique from shadows (on the bottom) to highlights (on the top) and so that I didn't end up with any gaps. I printed the first sheet with all the layers turned on.


The second with midtones and highlights turned on.


The third with highlights only.


10. Then you can applique the shapes to your block using fusible fleece.


Let me know if you have any questions!

J x

Thursday, 19 January 2012

Block Conundrum

Ooooh, I HAVE been away a while! I have done practially no sewing at all since New Year (unless you imclude fixing the hanging hook on my coat!) but I have had great intentions to start on my next quilt.

Last night I found the pattern I had saved for my Curio quilt and was ready to start slicing fabric, but I'm just not keen on it any more. After much research, I decided that Curio looks best in really detailed quilts and I found one that I think I will end up copying, but I am not quite sure how to do it.

My inspiration is here at Bellet Blog and the following picture is her own quilt.


I love the concentric circle spiderweb with a string pieced diamond shape between. It looks like a mixture between a Spiderweb and a Rocky Road to Kansas quilt. But the bit I can't figure out is how to draw the pattern pieces.

I have been researching Spiderweb blocks and the best I have found is at A La Mode which was sent to me by Kris, but the problem I have is that at this step;

(photograph from A La Mode's tutorial)

I need to split it into 3 seperate blocks (the left and right hand triangles would form segments of 2 spiderwebs and the central kite would be a quarter of a rocky road) so that I can make strings for each segment.

but what do I do about seam allowances? The tutorial has already accounted for seam allowances around the outside of the complete triangle (I presume) so do I just add 1/4inch along each side of the 2 blue lines for each of the pieces?

Advice needed as I think I fried my brain trying to do this last night and I really want to get started!

J x

EDIT: thank you Laura, my package arrived last night and it looks perfect. I can't wait to get started now! X